


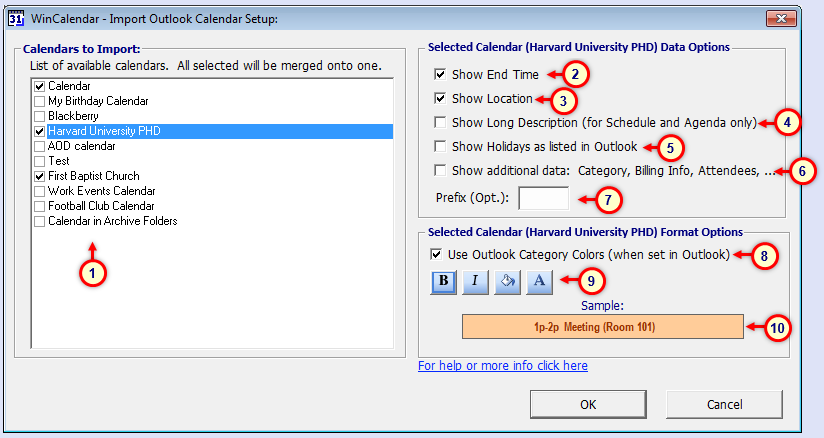
| 1) | Calendar(s) to import: All selected calendars will be merged into one generated Calendar. All versions of WinCalendar support up to 3 selected calendars, the Pro version supports unlimited selected calendars. In order for calendars to show up here, you must be using Outlook version 12 or newer and additional calendars must first show up in Outlook. |
| 2) | Show End Time: When checked imported appointments will show the end time. Applies to all appointments with a start and end time (does not apply to all-day appointments). Note, end time is always shown for 'Agenda'. |
| 3) | Show Location: If a location is set in Outlook, WinCalendar will display the location in parenthesis (). |
| 4) | Show long description: If set this will display the long description (aka: appointment body). Due to size restrictions, this is only available for Schedule, Agenda & Spreadsheet Table. Note: depending on your Outlook version, a Outlooks security mechanism may prompt you to allow WinCalendar to access this or related data. |
| 5) | Show Holidays as listed in Outlook: If checked, any holidays setup in Outlook will also be imported as a WinCalendar appointment. Note this may result in duplicate holidays. Also note, this data is not optimized for fast access by Outlook... if importing is taking to long, consider turning this off. |
| 6) | Show Additional Data: This data is only available through Excel and only for Spreadsheet Table. This data can be very useful for records keeping, auditing and client billing purposes. This data requires a Pro license to import (otherwise WinCalendar imports a few days worth of data from Today date for demo purposes only). Note: this data is not optimized for fast access in Outlook... if importing is taking too long, consider turning this off. Also note, depending on your Outlook version, a Outlooks security mechanism may prompt you to allow WinCalendar to access this or related data. |
| 7) | Prefix: If desired enter text to show up before each appointment item (but after any appointment time). This may be useful for distinguishing between appointments from different calendars - especially if printing to a black and white printer. |
| 8) | Use Outlook Category Colors: If turned on, Outlook Category colors are used for the background color. Note this feature only works for your primary calendars. This feature does not work for other Calendars that are shared with you. |
| 9) | Formatting Buttons: Set Bold / Italic / Background Color and Font Color. Note to change the font or font size, refer to the Font & Common Properties dialog. |
| 10) | Sample: Preview Sample for set format. Note to change the font or font size, refer to the Font & Common Properties dialog. |